
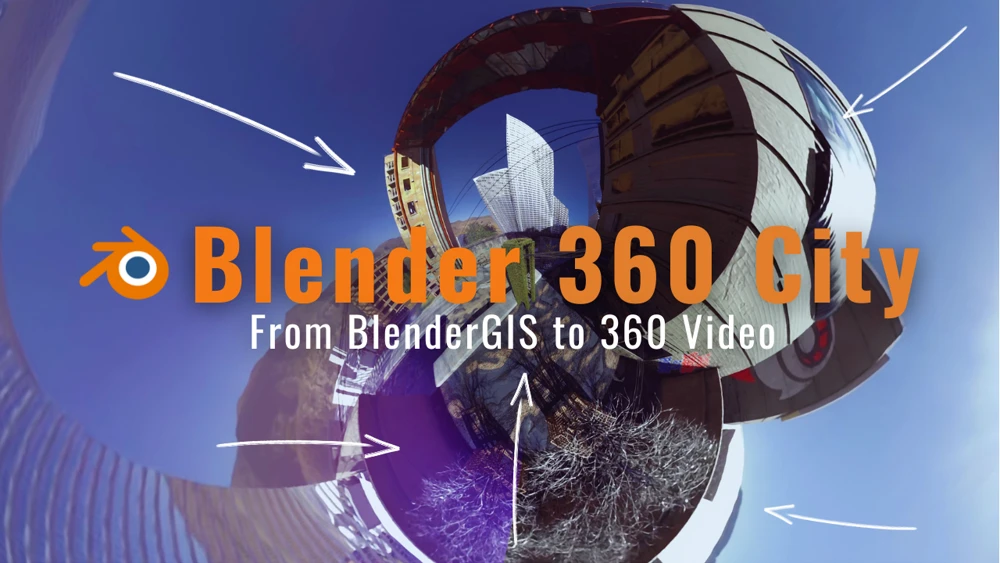
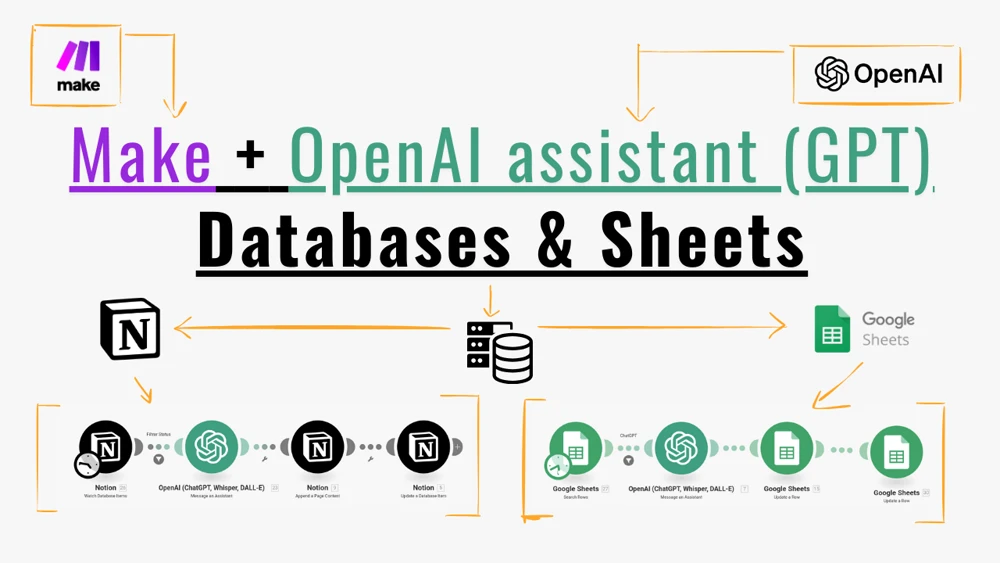
Creating immersive 360-degree worlds and landscapes in Blender
In today's fast-paced digital landscape, where immersive content rules supreme, there's an ever-growing demand for creators to push the boundaries of visual storytelling. In this tutorial, we'll delve even more deeply into the art of crafting 360-degree worlds using Blender, going beyond the basics to explore advanced techniques for adding depth, realism, and interactivity to your virtual environments, all while ensuring that your content is in line with the latest trends and techniques in the world of immersive media. Content:- Introduction
- Prerequisites
- The Process (very very simplified)
- Here is the video at low resolution (used to test that the process works perfectly fine)
- Here at about 5000x2500 (not bad but not yet)
- And here at full 12 K resolution (the struggling goal)
Creating a 360-degree world in Blender with animated vegetation, realistic camera movements, and injecting metadata for YouTube is an exciting project that allows you to immerse your audience in a virtual environment. In this comprehensive blog post, I’ll guide you through each step of the process to achieve this impressive result.
Introduction
In recent years, 360-degree videos have gained popularity, offering viewers a fully immersive experience. In this tutorial, we will explore how to create a stunning 360-degree world in Blender. We’ll cover animated vegetation, realistic camera movements, and preparing the video for YouTube with metadata injection.
Prerequisites
Before we dive in, make sure you have the following:
- Blender (latest version, Blender 3.6 at the time of this post)
- Botaniq addon (for vegetation)
- Camera Shakify addon (for realistic camera movements)
- Spatial Media Metadata Injector
The Process (very very simplified)
Step 1: Setting up Your Scene
- Open Blender and create a new project.
- Create your scene. In this case this contains the following layers:
- Sky (HDRI image used for lighting)
- Background (with some extra mountains)
- Ground: a simple plane modified with geometry nodes.
- Palace and VDF plume.
- Clouds with VDF elements.
Step 2: Adding Animated Vegetation with Botaniq
- Install and enable the Botaniq addon.
- Use Botaniq to add animated vegetation like trees, grass, and flowers to your scene.
- Animate the vegetation using Blender’s animation tools to make them sway in the wind or react to your camera’s movement.
- Bake the animations or you will die waiting for the render.
Step 3: Realistic Camera Movements with Camera Shakify
- Install and enable the Camera Shakify addon.
- Create a camera in your scene and set it as your active camera.
- Use Camera Shakify to add realistic camera shake, pan, and tilt to your shots. This will make your 360 video feel more immersive and dynamic. In this example I did the approximation paste.
Step 4: Rendering in Equirectangular View
- Configure your render settings for 360-degree video.
- Set the output format to equirectangular view. This format is compatible with 360-degree video platforms like YouTube.
- Adjust the resolution and frame rate to your desired settings.
Step 5: Animation and Rendering
- Animate your camera’s movement and vegetation over the desired duration.
- Ensure your lighting and materials are set up for a realistic look.
- Render your animation. This might take some time, so be patient.
Step 6: Injecting Metadata for YouTube
- Before uploading to YouTube, you need to inject metadata to make your video 360-degree compatible.
- Use a tool like “Spatial Media Metadata Injector” to add the necessary metadata to your video file.
Step 7: Uploading to YouTube
- Log in to your YouTube account.
- Click on the upload button and select your 360-degree video.
- While your video is uploading, set it as a 360-degree video in the video settings.
This scene was rendered in 3 times, at different resolutions as you can notice in the following videos, going up to a 12 K video resolution for the nocturnal scene. This wasn’t easy at all, but so many lessons where learnt through this process. I encourage you not only to check this videos out, but to stay in tune to see the tutorial on this. It will be released with spanish audio but full of annotations and quotes in english to get it understandable for the big public.
Here is the video at low resolution (used to test that the process works perfectly fine)
Here at about 5000x2500 (not bad but not yet)
And here at full 12 K resolution (the struggling goal)
I hope you can perceive the effort here, so please, feel free to share it, comment here or in the youtube comments and contact me if you need help with anything about rendering 360 landscapes.
